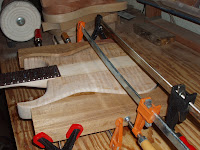
 It is Wednesday October the 7th and I have just the bodies to the neck. Here is how I did it. First get a couple of damp rags and have them ready. Take one of the damp rags and gently wipe the bodies clean of any dust or other material. Take the same rag and wipe down your work area. Give your work area plenty of free space. Have your clamps at the ready. Lay out the guitar sides along with the neck. You want the bodies flush with the top of the guitar so position the bodies with the neck upside down as see in this picture.
Remove the neck and take the Tightbond glue or what ever wood glue you use and spread onto the edges of the neck that will have the bodies attached. Spread it thick and use your fingers to spread it thickly over the entire area. Do this on both sides of the neck.
Place the neck back between the two body parts and bring the sided in contact with the glue. Slightly move each body half back and forth along the sides of the neck. In the above image I'm using glue press in the shape of the guitar that is being built. Note the neck is laying flat on the table with the fret board end butted up against the edge of the table. It is paramount the the top of the guitar bodies be flush as possible with the top of the neck when you are done.
You should have at least three clamps but four would be preferred. I had my wife hold the neck in place while I ensured that the butt and the top of the gguitar lined up as close I could get them. Use a rubber mallet to tap the guitar bodies into the right placement but hurry, you do not have a lot of time before the glue begins to set.
Next continue on with the tightening of the clamps. Again use your rubber mallet if the parts should shift. Keep tightenting until the clamps are all set and the glue is oozing out of the top the back, the front, and the bottom. check for gaps. Add glue to the gaps using your finger and keep tightening the clamps. Take your one good rag and remove the excess glue. Wipe it all away.
Check the clamp placement, move and relocate as necessary. Keep wiping and moving clamps until you have the best possible glue job your can. This is a one time deal so make it count.
For the next few hours I'll be going back and forth checking on the drying process ensuring that all is as I left it. This is turning out to be one my the best guitar builds I have done so far and once I get through the routing, I'll be home free.


No comments:
Post a Comment