 I recently sold a very nice two piece guitar body on Ebay and the buyer asked if I could glue the wings to a neck and route out the pickup cavities. The buyer purchased a very nice 12 string through the body neck from Carvin and it did arrive this week while I was away working in Kansas. I do like Carvin necks and I've never really had any issues with them in the past. Carvin use to leave a lot more wood on the lower portion especially on the sides and the lower portion was much thicker. Still a great neck.
As you can see in the photo, there is nothing that can be planed or joined on the sides of the neck any longer and there is not a lot that can be removed from the bottom.
To see how they build these necks check out this YouTube video: http://www.youtube.com/watch?v=BA6IukKYymI
To see how they build these necks check out this YouTube video: http://www.youtube.com/watch?v=BA6IukKYymI
 I got the body out from safe keeping and I thought it would be nice to show how I add the wings to the neck and prep the project. I like doing things in stages and this would be getting the getting the neck ready stage. Though the neck comes 85% finished there is a lot of work that has to be done to the neck before any gluing can begin. First I start by removing any excess wood from the neck. Carving leaves an extended heal that needs to be cut back two where the wings line up on the neck. The faint red circle is the part that must be trimmed downed
 To remove the excess, I begin by lining up the wings with the neck upside down or the frets on the bottom. I extend the neck out so that the back or the end of the neck butts up to the edge of the work bench allowing the neck to lie flat.
I then place the bottom wing along side its corresponding edge and stop the front edge of the lower wing at the third to the last fret of the neck.
 I do the same with the top part of the body stopping the front part of the wood at the forth to the last fret. Ensuring that the bodies are in the right place I draw a pencil line the length of the bodies on the wood that protrudes above the bodies. The bottom of the neck needs to be planed down to that line.
 \

The next step is to mark the area of the heel that need to be brought down to match the contouring of the horns of the two body sections. Using a pencil, I mark off the area for removal and being by using a hand drill to round off the marked section. Next I break out the chisels and carefully begin to remove as much of the wood as I can.

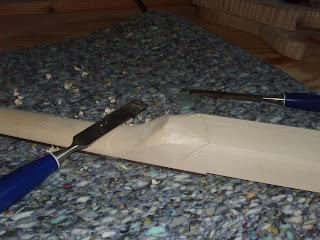
When I first began building guitar bodies, I used chisels to do the majority of the rough work so I'm comfortable using them but they may not be for everyone. The first rule of using a chisel is ensuring they are sharp and can hold an edge. Keep the flat side of the chisel up so that you do not dig down into the wood.
I take of about 1/2 to 3/4 of the excess wood with a chisel and then use a palm sander with 220 grit to remove and shape the remainder. Be sure to stop and recheck your placement with the two body parts. Once the wood is gone it is not coming back so take your time.

 I'll keep working the wood down until I get the look and the contour as close as I can minus the final finish. This part is important as I need to leave some wood for the final sanding of the entire body. After I get to having just the finish phase left, I move on to removing the excess length. Again take your time. Measure twice, cut once.

This next part is very important because I'm getting very close to the next stage which is gluing it all together. You do not want to 'fix' the alignment once the guitar comes together so layout the guitar on a flat surface and check and recheck your alignment of the pieces, how the contours come together and if it needs 'fixing' this is time to do it. Do not think your going 'fix it' once it comes together. I'll take the guitar in and out of the gluing rack until I'm satisfied with how it comes together. I want the joints tight and as seamless as possible. Check and check it again!
Here is the guitar getting ready for the next phase which is gluing it together.

 I like to let the guitar stew for day or two before I go on to the next phase.
 I'll walk in and out of the shop taking it a part and putting it back together, doing some minor sanding or micro planing with a scraper. This first phase took close to 4.5 hours to complete.
Onto the next phase: Gluing.

No comments:
Post a Comment